Creating Cross-Platform Apps with Ionic and Electron
You may know:
- Web Development
- Ionic
- Javascript
- Typescript
- Electron
- Angular
Buid Tools:
- Node
- Git
- Electron
- Ionic
- IDE Visual Studio Code
Mac Tools:
- Homebrew: package manager for MacOS
- MacOS Packages: brew install node, brew install git,
- Npm Packages: npm install -g ionic@latest
Windows Tools:
- Git
- Node
- Npm Packages:
npm install -g ionic@latest
First App:
- Steps with Ionic CLI
mkdir ionic
cd ionic
ionic start hello-world tabs
cd hello-world
ionic serve
Why Ionic:
- Multidevice support
- Simple clean interface
- Budget
- Multi platform
Some Configuration
Ionic behind a proxy
https://ionicframework.com/docs/cli/configuring.html#using-a-proxy
To proxy HTTP requests performed by the CLI, you will need to install the CLI proxy plugin:
npm install -g @ionic/cli-plugin-proxy

// Set env variables
$ export HTTP_PROXY="http://proxy.example.com:8888" # also used by npm
$ export HTTPS_PROXY="https://proxy.example.com:8888" # also used by npm
$ export IONIC_HTTP_PROXY="http://proxy.example.com:8888"
Each CLI that you use must be configured separately to proxy network request.
$ npm config set proxy http://proxy.company.com:8888
$ npm config set https-proxy https://proxy.company.com:8888
$ git config --global http.proxy http://proxy.example.com:8888
SSL Configuration
You can configure the Ionic CLI’s SSL (similar to configuring npm CLI):
$ ionic config set -g ssl.cafile /path/to/cafile # file path to your CA root certificate
$ ionic config set -g ssl.certfile /path/to/certfile # file path to a client certificate
$ ionic config set -g ssl.keyfile /path/to/keyfile # file path to a client key file
Telemetry
Disable to avoid Ionic LCI send data to Ionic.
ionic config set -g telemetry false
Desktop UI with Ionic
Inicial steps:
// Set npm behind a proxy
npm config set proxy http://<username>:<password>@<proxy-server-url>:<port>
npm config set https-proxy http://<username>:<password>@<proxy-server-url>:<port>

ionic start dispatcher blank  // or download from https://d2ql0qc7j8u4b2.cloudfront.net/ionic-angular-official-blank.tar.gz
cd dispatcher
ionic serve
ionic generate --pagesDir src/app/ page setup
ionic serve -b
Open the dispatcher directory into VSC
Follow convertions: https://angular.io/guide/styleguide
Dev server: http://localhost:8100
The library import { NavController } from 'ionic-angular'; is used to manage Navigation into Ionic.
Steps Add New Page and link to Home
Reference: <ion-fab> and <ion-fab-list>
- Create a new page, called setup
ionic generate --pagesDir src/app/ page setup
ionic serve -b
- Change setup.html
<ion-content padding>
  <ion-grid>
    <ion-row justify-content-center>
      <ion-col col-8>
        <div class="wr-well">
          <h1>
            Go Far - Stay safe
          </h1>
          <h6>Before you begin, we need your name and phone number</h6>
        </div>
        <ion-list>
          <ion-item>
            <ion-input type="text" placeholder="Name" (value)="name"></ion-input>
            <ion-input type="text" placeholder="Extension" (value)="extension"></ion-input>
            <button ion-button outline iten-right icon-right (click)="setInfo()">
              Set
              <ion-icon name="arrow-forward"></ion-icon>
            </button>
          </ion-item>
        </ion-list>
      </ion-col>
    </ion-row>
  </ion-grid>
</ion-content>
Change setup.scss
```
page-setup {ion-content { backgound: url(../assets/images/country-road.jpg) no-repeat center center fixed; background-size: cover; }}
Update setup.ts
setInfo() {
  this.navCtrl.setRoot(HomePage);
}
Change app.scss for overall styling:
- ```
body {
font-family: Arial, Helvetica, sans-serif;
}
.wr-well {
text-align: center; margin: auto; max-width: 800px; padding: 20px 15px 0;- ```
  h1, h2, h3, h4, h5, h6 {
      color: #fff;
      text-shadow: 2px 2px 5px rgba(0, 0, 0, 0.6);
  }
   }

   .wr-float {
          position: absolute;
          top: 25px;
          left: 15px;
          right: 15px;
          background-color: transparent;
      }
      \`\`\`

6. Link to the home page into `<ion-content>`
   1. `<ion-fab top left #fab>
          <button ion-fab><ion-icon name="more"></ion-icon></button>
          <ion-fab-list side="right">
            <button ion-fab (click)="gotoSetup(fab)"><ion-icon name="cog"></ion-icon></button>
          </ion-fab-list>
        </ion-fab>`

7. Create gotoSetup method into home:
   1. `gotoSetup(fab: FabContainer) {
          fab.close();
          this.navCtrl.push('SetupPage', {}, { animate: true, direction: 'forward'
          });
        }`

8. Serve:
   1. `ionic serve`

9. aa

### Steps Add Address List Page

Learn: Providers

@Injectable\(\): decorator used in a component for be used in others \(DI\)

See [https://angular.io/guide/dependency-injection](https://angular.io/guide/dependency-injection) for more info on providers and Angular DI

See [https://ionicframework.com/docs/components/\#navigation](https://ionicframework.com/docs/components/#navigation) for more info on Ionic pages and navigation.

See Angular AsyncPipe

See Observables vs Promises

* Create provider:
  *

ionic generate --providersDir src/app/core provider address-service
```
- Create page into that provider:
ionic generate --pagesDir src/app/ page address-list
Check the created provider into VSC. There is code that coud generate errors, please delete them at this time. Http references and rx. So the component looks like:
import { Injectable } from '@angular/core';

@Injectable()
export class AddressServiceProvider {

  constructor() {
    console.log('Hello AddressServiceProvider Provider');
  }

}
Check the Address-list page in VSC. The address-list.html. Async tells Angular to wait for Promises resolves.`` indicates Angular to execute toString automatically (the string representation).
<ion-content padding>

  <div class="wr-well">
    <h1>Travel where you want</h1>
    <h6>Make sure emergency services can always find you.
      Select your current location below.
    </h6>
    <ion-card *ngFor="let address of addresses | async">
      <ion-item>
        <ion-icon item-right name="locate" (click)="selectLocation(address)"></ion-icon>
        <ion-icon item-left large [name]="address.icon"></ion-icon>
        <srtong color="dark"></srtong>
        <p> <br /> Last selected: </p>
      </ion-item>
    </ion-card>
  </div>
</ion-content>
See address.list.ts. Using promises returned by service provider.
import { Component } from '@angular/core';
import { IonicPage, NavController, NavParams } from 'ionic-angular';
import { Address } from '../core/address';
import { AddressServiceProvider } from '../core/address-service/address-service';
import { HomePage } from '../../pages/home/home';

@IonicPage()
@Component({
  selector: 'page-address-list',
  templateUrl: 'address-list.html',
})
export class AddressListPage {

  public addresses : Promise<Address[]>;

  constructor(public navCtrl: NavController, private addressService : AddressServiceProvider ) {
  }

  ionViewDidLoad() {
    console.log('ionViewDidLoad AddressListPage');
    this.addresses = this.addressService.fetchAll();
  }

  selectLocation(address: Address) {
    this.navCtrl.setRoot(HomePage, { address });
  }
}
Connect with home page, into home.html, home.ts and address-list.scss respectively
// Into fab-list
<button ion-fab (click)="gotoLocations(fab)">
        <ion-icon name="locate"></ion-icon>
</button>
gotoLocations(fab: FabContainer) { fab.close(); this.navCtrl.setRoot('AddressListPage'); }page-address-list { ion-content { background: url(../assets/images/east-road-sign.jpg) no-repeat center center fixed; background-size: cover; } }
Steps Add Google Maps Integration to Home Page
Learn: Providers
Steps:
- Add Google Maps library
npm install @agm/core --save
Add Module to app.module.ts
import {AgmCoreModule} from '@agm/core';

// imports array
imports [
...
AgmCoreModule.forRoot()
]
Update home.html using the map:
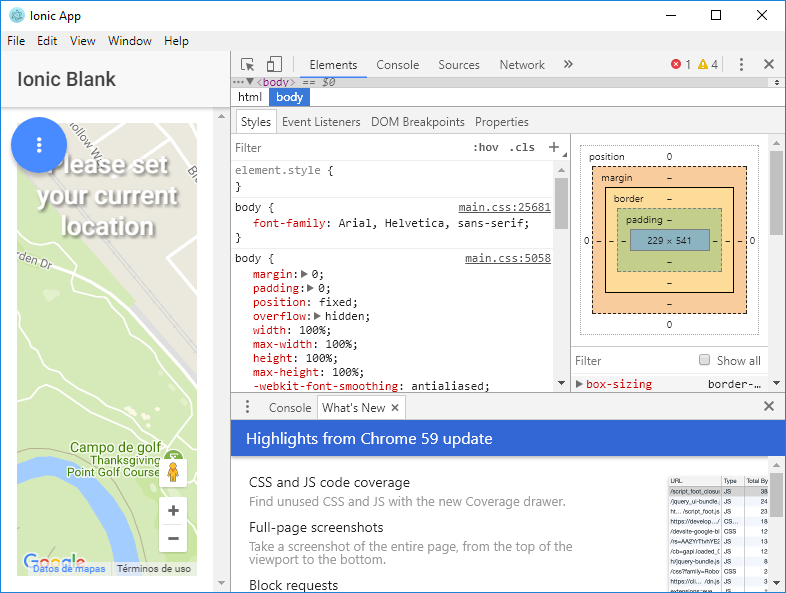
<ion-content padding>
  <agm-map [latitude]="getLatitude()" [longitude]="getLongitude()" [zoom]="18">
    <agm-marker [latitude]="getLatitude()" [longitude]="getLongitude()">
      <agm-info-window [disableAutoPan]="true">
        <div *ngIf="located">
          <strong>
            Current location:
          </strong>
          <br />
        </div>
        <div *ngIf="!located">
          <strong>
            Not protected
          </strong>
          <br /> Current location(estimated)
        </div>
      </agm-info-window>
    </agm-marker>
  </agm-map>

  ..
    <div class="wr-well wr-float">
    <h1 *ngIf="located">Congratulations, you are protected!</h1>
    <h1 *ngIf="!located" class="danger">Please set your current location</h1>
  </div>
</ion-content>
Update home.scss
page-home {
    agm-map {
        height: 100%;
        width: 100%;
    }
}
Update home.ts
...
export class HomePage {

  address: Address;

  defaultMapInfo = {
    lat: 40.429761,
    lng: -111.8952174
  };

  located = false;

  constructor(public navCtrl: NavController, private navParams : NavParams) {
    this.address = navParams.data.address;
    if (this.address) {
      this.located = true;
    }
  }

  getLatitude() : number {
    return this.located ? Number( this.address.latitude ) : this.defaultMapInfo.lat;
  }

  getLongitude() : number {
    return this.located ? Number( this.address.longitude ) : this.defaultMapInfo.lng;
  }
...
Result

https://developers.google.com/maps/documentation/javascript/get-api-key?hl=es-419
To use Google API key:
imports: [
...
AgmCoreModule:.forRoot( {apiKey: '<YOU API KEY GOES HERE>'})
]
Electron turns the Web App into a Desktop App which run on Windows or MacOS
Interacting with the Host
Electron uses ES6, Ionic uses Typescript.
Demo: Add electron, application title and icon, menu bar, system tray, ui tweaks
What is Electron?
Now in Electron 2 Beta 1 (21 Feb 2018)
Electron 1.8.2 is stable version (2 Feb 2018)
Set of libraries build on top of Node and Chromium. As Cordova is for Mobile apps, Electron is por Desktop apps.
Electron consists of two process: Main process (to connecting with host operating system) and Rendered Process (related to t the web app been displayed).
What platforms Electron supports?
MacOs 10.9 and later; Windows 7 and later (32 and 64 bit); Linux (32 and 64 bit). For Android and iOS apps.
Which does language Electron use?
ES6 is the default. So it is good to use ES6 for Electron and Typescript for Ionic to avoid difficulties. It is good to learn both languages.
https://github.com/electron/electron/blob/v2.0.0-beta.1/docs/tutorial/about.md
https://electronjs.org/releases
Adding Electron to Dispatcher
Install Electron
npm config set proxy http://Z462725:[email protected]:8020
npm install electron --save-dev
Steps
How to integrate Electron and Ionic? We need to lunch Electron first and tell it about Ionic app.
- Create a bootstrap file. Electron will launch this file and this file needs to configure and run the Ionic app. https://electronjs.org/docs and https://electronjs.org/docs/tutorial/quick-start
mkdir server
cd server
touch main.js
Into the main.js: https://electronjs.org/docs/api/browser-window
- ```
const { app, BrowserWindow } = require('electron'); // provider by electron
const path = require('path'); // provided by node
const url = require('url'); // provided by node
let win
// This method will be called when Electron has finished initialization
// and is ready to create browser windows. Some APIs can only be used
// after this event occurs
app.on('ready', createWindow);function createWindow() {
   // Create the browser window
   win = new BrowserWindow\( {width: 800, height: 600}\);
// and load the index.html of the app // Tell Electron to open its internal Chromium browser to the ionic app win.loadURL(url.format({ pathname: path.join(__dirname, '../www/index.html'), protocol: 'file:', slashes: true })); // Open dev tools, it is optional // win.webContents.openDevTools(); // Emitted when the window is closed win.on('closed', () => { win = null; });}
// Quit when all windows are closed
app.on('window-all-closed', () => {// On MacOS it is common for applications and their menu bar to stay active until // the user quits explicitly with cmd + Q if \(process.platform != 'darwin'\) { app.quit\(\); }});
// On MacOS is common to recreate a window in the app when the dock icon is clicked and
// there are no other windows open
app.on('activate', () => {if \(win === null\) { createWindow\(\); }});
```- ```
Generate the content in www/. That is executing the build (ionic will build the web app and copy the contents in www folder)
npm run build
Run electron (if it was installed globally)
electron ./server/main.js
- Instead of that, and because electron was installed as a dev tool, change package.json to add main entry point and start script:
  {
  "name": "dispatcher",
  "version": "0.0.1",
  "author": "Gisela Medina",
  "homepage": "http://ionicframework.com/",
  "main": "server/main.js",
  "private": true,
  "scripts": {
    "start": "electron .",
    "clean": "ionic-app-scripts clean",
    "build": "ionic-app-scripts build",
    "lint": "ionic-app-scripts lint",
    "ionic:build": "ionic-app-scripts build",
    "ionic:serve": "ionic-app-scripts serve"
  },
- Run
npm start
- This way the app is running into an electron shell instead of browser, but it seems the same. F12 to see the dev tools, it must work.
Fixing the window title
Electron is a wrapper for the Ionic app, and first it runs the Electron browser window with its title and after the Ionic App is served. The title text is changed between page and page in Ionic. To solve the problem, delete all title tag in HTML pages (index, setup and address-list) and let Electron title be the main.
Changes in main.ts, you need to run: npm start
But electron does not know about Ionic changes so it is necessary to run also the build for Ionic: npm run build & npm start
Setting the application icon
To proxy HTTP requests perform
aa
References
https://angular.io/guide/styleguide
https://ionicframework.com/docs/cli/configuring.html#using-a-proxy